Connecting a device
When you open Remappr you land on the Start Page — "Configure Your Device — connect your device to customize keymaps and settings." It is where you connect hardware, open the builder, or try the demo.
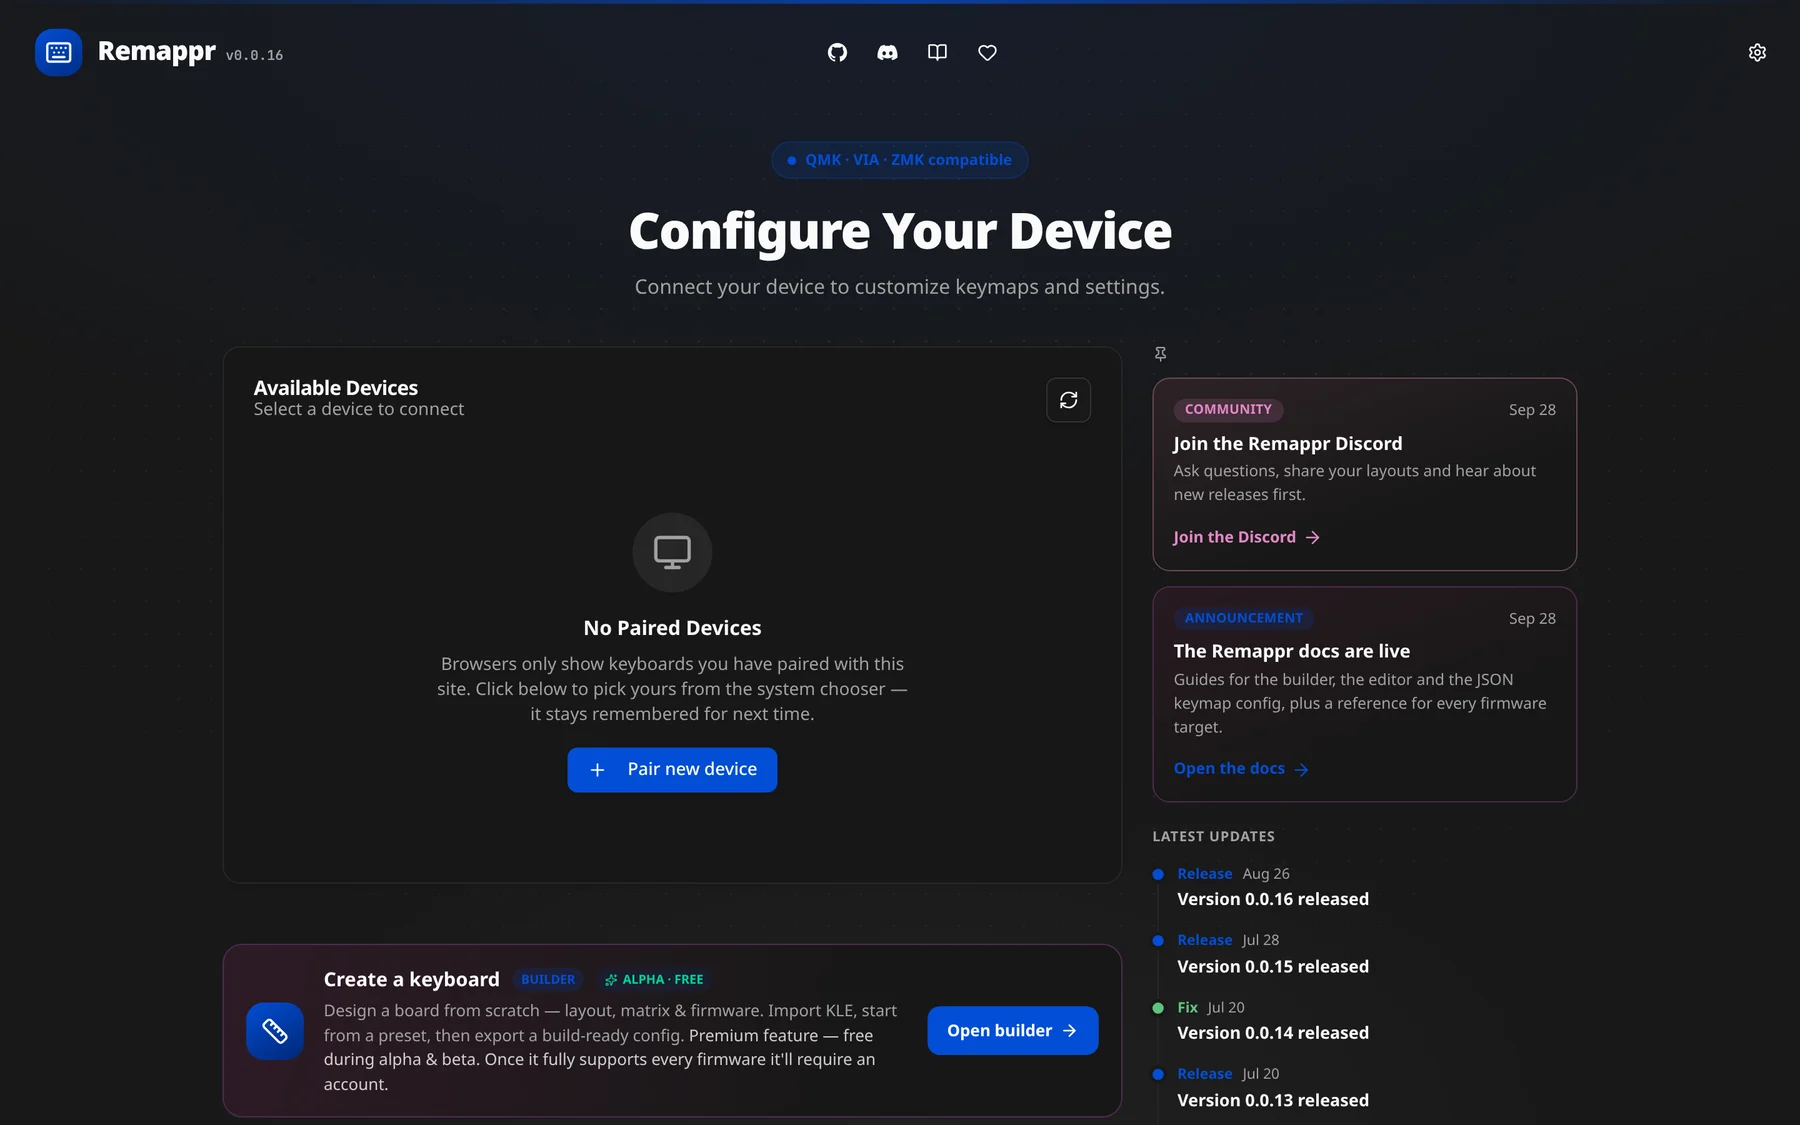
The top bar holds the logo and version on the left, the project links (GitHub, Discord, documentation, ♥ support) in the middle, and Settings on the right. The right-hand column is the news rail — releases and announcements; pick another layout, or turn it off, in Settings → Start page.
Connect to a keyboard
The Available Devices card lists detected devices. Until a board has been paired it reads "No Paired Devices": browsers only show keyboards you have already allowed for this site, so Pair new device opens the system chooser to pick one. Paired boards come back as cards with a small preview of their layout (shape and key colours only — never your bindings) and a Connect button.
- "Select a device to connect" (or "Select a connection type" for simple-connect transports).
- The Refresh button (↻) re-scans.
- Supported transports:
- ZMK — USB/serial (CDC-ACM) or BLE; the board needs ZMK Studio enabled.
- QMK / VIA / Vial — raw HID via the VIA protocol.
- Keychron — VIA/QMK + a BLE radio.
Pick a device and Remappr opens the keymap editor on its live keymap, showing only the features that firmware supports.
Unlocking
Some boards require unlocking before editing. You'll see an Unlock To Continue overlay — "For security reasons, your device requires unlocking before using Remappr." On ZMK this means assigning the Studio Unlock behavior to a key or combo and pressing it.
The device menu
Once connected, the device card at the bottom of the sidebar shows the device name and Connected · USB (or BLE). Its gear opens the device menu:
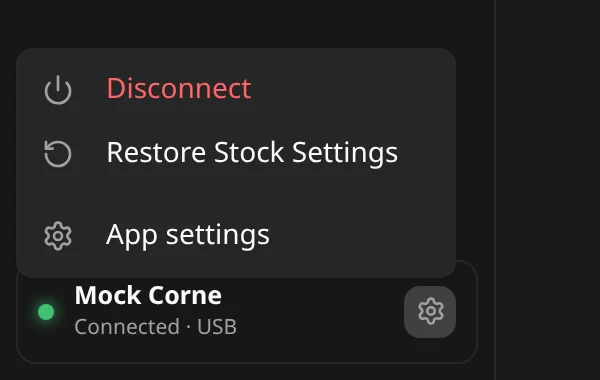
Entries depend on the device and the firmware:
- Mesh nodes — only on devices that report other nodes behind them (a dongle or a split coordinator). Lists each node, marks the one you are viewing with a check and offline nodes as offline; picking one opens that node's keymap. While viewing a node the first entry becomes Back to (parent). Node views are read-only today.
- Auto-connect on launch — a checkbox, shown once the device has been paired at least once. When ticked, Remappr reconnects to this device automatically the next time it starts. A manual Disconnect stops the reconnect loop for that session, so unticking is not needed just to work on another board.
- Disconnect
- Restore backup — only when the firmware supports profile restore and Remappr holds a backup for this device (see below).
- Restore Stock Settings — "removes any customizations previously made in Remappr and restores the stock keymap."
- App settings — opens the Settings dialog.
Backup & restore
Remappr keeps a local backup of each device's layout, keyed per device, and refreshes it as you edit. On firmwares that advertise profile restore (ZMK today) it can put that layout back:
- Automatic prompt — if a device reconnects wiped or reset (a flash, a settings-erase, a factory reset), Remappr shows "Restore your layout?" with the date of the last backup. Accept and it re-applies the stored keymap.
- Manual — Restore backup in the device menu re-applies the stored layout at any time.
- Skip the prompt — turn on Auto-restore profile in Settings → Communication and Remappr restores silently instead of asking.
Backups cover the keymap (keys and layers). They are stored on this machine — see Cloud sync on the roadmap for the hosted version.
Create a keyboard
The Create a keyboard card (badge BUILDER) opens the Builder: "Design a board from scratch — layout, matrix & firmware. Import KLE, start from a preset, then export a build-ready config." During alpha/beta it shows a {stage} · FREE badge and Open builder; at GA it becomes premium (🔒 Premium).
Try Demo Mode
Try Demo Mode — "Explore Remappr with a simulated keyboard — no device required." Opens the editor against a simulated 36-key Corne with a rotary encoder, the same config-driven flow as a real device. Every screenshot in this section of the docs was taken in demo mode, so you can follow along without hardware.
The demo keeps nothing: there is no Save button (there is no device to write to), and Disconnect returns to the Start Page with the board as it was.
Get the desktop app
Get the desktop app downloads the latest Remappr build for your OS — the desktop app has native USB/BLE/HID access the browser can't always provide.
Support this project
The ♥ Support this project button — on the Start Page and in the editor header — opens "Support this project — help keep Remappr free and open-source", with links to GitHub Sponsors, Ko-fi and Open Collective.